Ever wondered if you could transform your above ground pool into a saltwater oasis? You’re not alone! Many pool owners are looking for ways to make their swimming experience more enjoyable and less harsh on the skin.
Table of Contents
- 1 Key Takeaways
- 2 Understanding Saltwater Pools
- 3 Essential Equipment for Saltwater Pools
- 4 Steps to Convert Your Above Ground Pool
- 5 Adding Salt to Your Pool
- 6 Running the Saltwater System
- 7 Conclusion
- 8 Frequently Asked Questions
- 8.1 What are the benefits of converting an above ground pool to a saltwater system?
- 8.2 How does a salt chlorine generator work?
- 8.3 What equipment do I need to convert my above ground pool?
- 8.4 How do I set up the salt chlorinator?
- 8.5 How do I maintain proper salt levels in my pool?
- 8.6 Can I still use traditional chlorine products with a saltwater system?
Key Takeaways
- Understanding Saltwater Pools: Saltwater pools utilize a salt chlorine generator for safer water, reducing the need for harsh chemicals while maintaining water cleanliness.
- Benefits of Conversion: Converting to a saltwater system provides softer water, lower maintenance, cost efficiency, stable chlorine levels, and reduced chlorine odors.
- Essential Equipment: Key items for a successful transition include a saltwater chlorinator, water test kits, and maintenance tools like brushes and skimmers.
- Conversion Steps: Follow a step-by-step process, including draining the pool, scrubbing the walls, vacuuming debris, and inspecting for any damage before adding salt.
- Choosing Salt: Use pool-grade salt (99.8% purity) and calculate the amount needed based on your pool’s volume to achieve optimal chlorine production.
- System Monitoring: Regularly check salt levels and adjust the chlorinator settings to maintain optimal water quality, particularly during peak swimming seasons.
Understanding Saltwater Pools
Saltwater pools use a salt chlorine generator to convert salt into chlorine, creating a safer and more pleasant swimming environment. This method reduces chemical use while maintaining clean, clear water.
Benefits of Saltwater Systems
- Softer Water: Saltwater feels gentler on your skin and eyes, improving your overall swimming experience.
- Lower Maintenance: Salt systems self-generate chlorine, meaning less frequency in adding chemicals. You spend less time managing water chemistry.
- Cost Efficiency: Although the initial setup may cost more, long-term savings occur from reduced chemical purchases and lower maintenance expenses.
- Consistent Chlorine Levels: Saltwater pools maintain stable chlorine levels, minimizing fluctuations that can irritate skin or eyes.
- Reduced Chlorine Odor: Reduced chlorine levels mean fewer strong chemicals, enhancing your pool area’s overall atmosphere.
- Chlorine Source: Traditional chlorine pools rely on added chemicals. Saltwater pools produce chlorine from salt through electrolysis.
- Pool Maintenance: Chlorine pools generally require more frequent testing and chemical adjustments. Saltwater pools self-regulate more effectively.
- Water Feel: Chlorine pools can result in harsher water. Saltwater pools are often preferred for their soft, silky feel.
- Cost of Operation: Chlorine pools incur ongoing chemical costs. Saltwater pools require less chemical input, leading to potential long-term savings.
- Equipment Needs: Chlorine pools may need additional tools for chemical balance. Saltwater systems require a salt chlorine generator and may involve special materials for corrosion protection.
Essential Equipment for Saltwater Pools
Creating a saltwater pool requires specific equipment to ensure optimal performance and maintenance. Understanding what you need will help enhance your swimming experience.
Recommended Products

✔ UPGRADE TO A SALTWATER POOL – QS1200 saltwater system lets you enjoy the same process used for in-ground swimming pools to keep your above ground pool sparkling clear, suitable for pools up to 15,000 gallons.
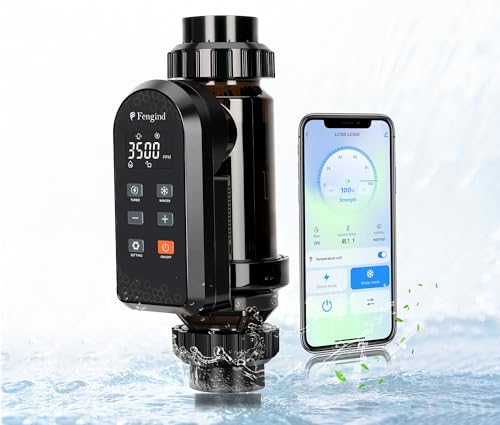
【Two Pipe Interface Options】: Our salt chlorine generator above ground pool offers two pipe connection options: 2 "Adapte (PVC pipe with an outer diameter of 60.3mm); 1.5"Adapte(PVC pipe with an outer diameter of 48.3mm)" . Please verify the pipe size before purchasing for a proper fit
Saltwater Chlorinator
A saltwater chlorinator is essential for converting salt into chlorine, keeping your water clean and safe. This device automatically generates chlorine as you filter your water. Look for a chlorinator that matches your pool size, typically measured in gallons. Consider the following factors:
- Size Requirement: Choose a model rated for your pool’s volume.
- Cell Type: Opt for a titanium or other durable cell types for longevity.
- Maintenance Needs: Select a model with low maintenance to save time and effort.
Test Kits and Maintenance Tools
Regular testing and maintenance ensure your saltwater pool remains clean and healthy. Invest in high-quality test kits and maintenance tools. Key items to consider include:
- Water Test Kits: Use test kits that check salinity, pH, and chlorine levels. Look for kits with digital meters for accuracy.
- Salt Test Strips: Buy strips designed for saltwater pools to monitor salt concentration easily.
- Pool Brushes and Skimmers: Keep debris at bay with robust brushes to scrub surfaces and skimmers for surface debris removal.
- Vacuum Systems: Choose automatic or manual vacuums suitable for above ground pools to maintain cleanliness.
Equipping your pool with the right tools will simplify care routines and enhance your overall pool experience.
Steps to Convert Your Above Ground Pool
Converting your above ground pool to a saltwater system involves several straightforward steps. Follow these steps carefully for a successful transition.
Recommended Products
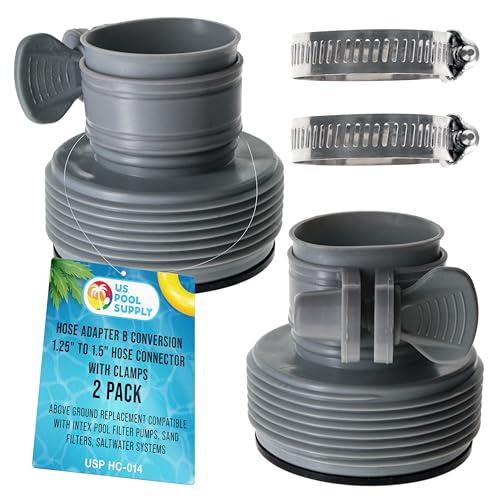
Adapter Type B Kit: Set of 2 Pool Hose Adapter B Conversion Connectors with Rubber Gaskets and 2 Plastic Screw-On Clamps and 2 Stainless-Steel Clamps. The adapters convert above-ground pools with 1.25" (32mm) clamp-on fittings to 1.5" (38mm) screw-on fittings. These high-quality B-type adapters resolve hose size diameter compatibility issues when connecting hoses to pool filter pumps.

Type A and B Adapter Set – Includes 2 Type A hose adapters, 2 Type B hose adapters, 2 stainless steel hose clamps, and 2 rubber washers for pool hose conversion, replacement, and backup use
Drain the Pool Water
- Turn Off Equipment: Ensure all pool equipment is off to prevent any damage.
- Drain the Water: Use a submersible pump or a garden hose to drain the pool water completely. Drain as close to the bottom as possible to eliminate as much water as you can.
- Check Local Regulations: Before draining, check local regulations to see if any guidelines apply to pool water disposal.
- Scrub the Walls: Use a non-abrasive scrub brush to clean the pool walls, removing algae, dirt, and other debris. Start from the top and work your way down.
- Vacuum the Bottom: Vacuum the pool floor thoroughly to collect dirt and debris. Use a manual or automatic pool vacuum for this task.
- Wash Accessories: Remove and wash any pool accessories, such as ladders and slides, in warm, soapy water. Rinse them thoroughly before placing them back in the pool.
- Inspect for Damage: Check the pool liner for any holes or tears. Repair or replace any damaged sections to ensure a watertight seal.
These steps set the foundation for a smooth transition to a saltwater system. Following this process enhances water quality and overall pool maintenance.
Adding Salt to Your Pool
Adding salt to your above ground pool is a straightforward process that enhances your swimming experience. It promotes softer water and less irritation to your skin and eyes.
Choosing the Right Type of Salt
Choose pool-grade salt for your saltwater system. Pool salt, often labeled as “salt for chlorinators,” is specifically designed for use in pools. Avoid using table salt or rock salt as they contain additives that can damage your equipment. Look for salt with a purity of at least 99.8%, which minimizes impurities that can affect water quality.
Calculating the Correct Amount of Salt
Calculating the proper amount of salt is crucial for optimal chlorine production. Use the following guidelines:
- Check Pool Volume: Calculate your pool’s volume in gallons. If unsure, refer to the manufacturer’s specifications or use an online pool volume calculator.
- Salt Requirement: Determine the salt level needed for your saltwater system, commonly around 3,000-4,000 parts per million (ppm).
- Calculate Salt Amount: Use this formula:
- Gallons of water x ppm desired ÷ 1,000,000 = pounds of salt needed.
For example, if your pool holds 10,000 gallons and you need 3,000 ppm:
10,000 x 3,000 ÷ 1,000,000 = 30 pounds of salt.
Add salt gradually to avoid over-salting. Distribute it evenly across the pool surface, and let the pump run for at least 24 hours to fully dissolve the salt. Regularly test the water to maintain proper salt levels and ensure efficient sanitation.
Running the Saltwater System
Running your saltwater system efficiently ensures a clean and enjoyable swimming experience. Follow these guidelines to keep your pool in top condition.
Recommended Products

【Massive 20g/H Chlorine Output】: Convert your above-ground swimming pool into a crystal-clear oasis! With a 20g/h output, a smart saltwater chlorinator efficiently disinfects pools up to 26,500 gallons using electrolysis. Simply add food-grade sea salt (99.6% NaCl) for continuous sodium hypochlorite production—no chlorine tablets needed.

INTELLIGENT MONITORING AND PROTECTION: The Westaho salt pool system features an advanced intelligent control panel, displaying key information like salt levels, pool water temperature, total cell usage time, cell operating voltage, and current. This ensures you're always aware of your pool's health. It also includes low water temperature protection, automatically shutting down below 52°F to extend cell lifespan and care for your pool
【 Your Pool's Intelligent Guardian】:Our smart salt chlorinator continuously monitors pool conditions to ensure optimal swimming environment: F6 indicates high salinity (>5000ppm) - add water and hold Salt button for 3s; F2 means low flow (<2m³/h) - check circulation system; F5 shows low salinity (<2500ppm) - add salt and hold Salt button for 3s. Refer to pages 10-11 of the manual for detailed instructions.
Initial Setup of the Salt Chlorinator
Set up your salt chlorinator according to the manufacturer’s instructions. Begin by ensuring it’s compatible with your pool size and type. Once you’re ready, connect the chlorinator to the filtration system. Adjust the flow rate as recommended, usually between 1,500 to 2,500 gallons per hour.
Next, set the desired chlorine output on your chlorinator. A common starting point is around 50% output, which you can adjust based on your pool’s chlorine needs. Remember to check the salinity level, aiming for around 3,000 to 3,500 parts per million (ppm), depending on your chlorinator model.
Once everything is connected and adjusted, turn on the system. It usually takes 24 hours to start generating chlorine effectively, so allow some time before checking water quality.
Monitoring and Adjusting Salt Levels
Regularly monitor the salt levels in your pool. Use a salt test kit every two weeks or after heavy rain or pool usage. If the salt level dips below 3,000 ppm, add salt as needed, following the recommended amount for your pool size.
Visual indicators, such as the chlorinator’s salt level display, help track the salt concentration. If you notice insufficient chlorine production, check the salinity first. Adjust as necessary since low salt levels cause the chlorinator to underperform.
If your water appears cloudy or green, it may indicate an imbalance or insufficient chlorine. In such cases, testing water chemistry, including pH and alkalinity levels, becomes essential. Aim for a pH between 7.4 and 7.6 for optimal chlorine efficiency.
Consider running your chlorinator for longer hours during peak swimming seasons when usage increases. It effectively maintains consistent chlorine levels, ensuring optimal water quality.
Conclusion
Switching your above ground pool to a saltwater system can transform your swimming experience. Not only will you enjoy softer water but you’ll also appreciate the reduced maintenance and cost savings. With the right equipment and care you can keep your pool sparkling clean and inviting all season long.
Embrace the benefits of saltwater and create a refreshing oasis in your backyard. You’ll love how easy it is to maintain and how great it feels to swim in. Dive in and enjoy the difference!
Frequently Asked Questions
What are the benefits of converting an above ground pool to a saltwater system?
Converting to a saltwater system offers numerous benefits, including softer water that’s gentler on the skin, lower maintenance requirements, cost efficiency through reduced chemical use, consistent chlorine levels, and less odor compared to traditional chlorine pools.
How does a salt chlorine generator work?
A salt chlorine generator converts salt into chlorine through a process called electrolysis. This method produces chlorine continuously, helping to maintain clean and safe water with fewer chemicals, resulting in a more pleasant swimming experience.
What equipment do I need to convert my above ground pool?
To convert your above ground pool to a saltwater system, you will need a salt chlorine generator, a pool salt specifically designed for this purpose, and possibly installation equipment such as a sump pump, as well as a testing kit to monitor chlorine and salt levels.
How do I set up the salt chlorinator?
To set up the salt chlorinator, follow the manufacturer’s instructions. Typically, you’ll add the recommended amount of salt to your pool water, allow it to dissolve, and then connect the salt chlorinator to your pool’s circulation system. Adjust the settings based on your pool size for optimal chlorine production.
How do I maintain proper salt levels in my pool?
Regularly test your pool water with a salt testing kit to ensure salt levels fall within the recommended range, usually between 2700-3400 ppm. If levels are low, add salt gradually, retesting frequently until you reach the desired concentration.
Can I still use traditional chlorine products with a saltwater system?
Yes, you can use traditional chlorine products sparingly if needed, but a properly maintained saltwater system typically maintains consistent chlorine levels. If you choose to use additional chlorine, do so in moderation to avoid disrupting the balance of your saltwater system.